
I can build fancy electronic devices, but can I remember to water my houseplants before they are drooping and brown?
The following won't suit all plants, but it works well with some. This is not a 15 minute project, but it does work, and I've had fun experimenting with the details.
I hope you won't be so boring as to exactly copy what I've done in every detail. I'm sure that the ideas presented here can be improved upon. But as you make modifications, continually ask yourself if your way retains certain fail-safe provisions in my design. You don't want to find you house watered... just your house plants.
A simple plastic "windowbox" was the basis of my device. The size isn't critical, but mine is 18cm high, 18cm wide and 60cm long. (7" x 7" x 24")
The windowbox had no drain holes in it... this is important. And it had what was intended as a tray to go under the box. That tray, happily for my needs, fit nicely into the top of the window box.
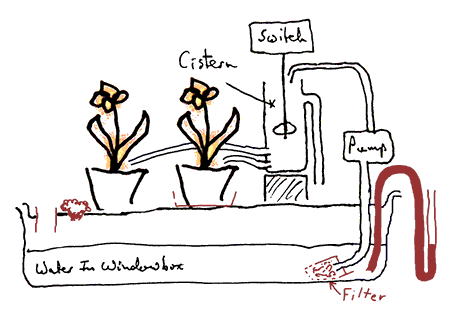
I'm using the tray as a tray for several plants, and the box for a reservoir for the water for the plants. All that is missing from the drawing below is the pump that takes water from the reservoir and puts it into the plant's pots. (Sorry about the illustrations, by the way. Getting this out the door was my priority... maybe I'll feel artistic one day. Do write if you find you can't tell from them what you ought to be able to.)
Details will be provided later, but first the overview:
Once every day or so, water is pumped from the reservoir onto the top of the soil in the plant pots. The water drains through the pots, and if the plant is over watered, the water merely runs out the bottom and through holes in the tray supporting the pots, and back into the reservoir.
As you read on, notice that considerable attention has been paid to making this system fail-safe. For instance, as you will see in a moment, two things have to go wrong for the water pump to become "stuck" pumping away for hours on end.
How often are the plants watered? That's up to you! The pump is a simple automotive windshield waster pump. The electricity for that... only 12 volts... another safety choice... comes from a power supply which is turned on and off by an ordinary timeswitch. (As you are reading my Sensing and Control pages, no doubt you could get fancy, and have the thing computer controlled, if you wished, but for this a simple 7 day time switch seems more than adequate.)
However, the pump isn't controlled by the timeswitch alone. Inexpensive 7 day timeswitches do not allow you to turn the pump on for short enough periods.
Study the following for a moment, and then read on....
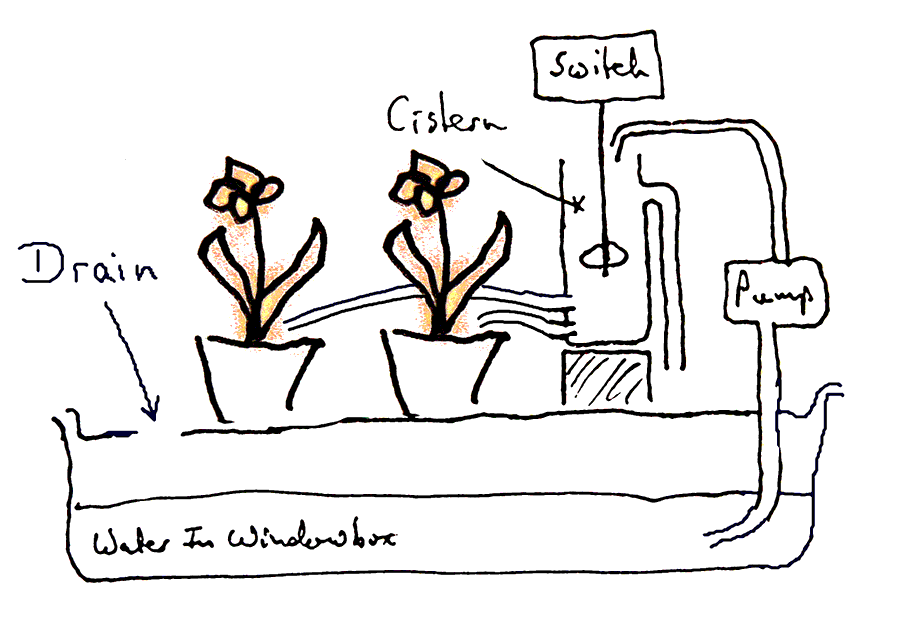
The drawing shows a cistern. It is filled by the pump, which draws from the water in the windowbox underneath the tray holding the plants.
From the left side of the bottom of the cistern two small tubes bring water to the plants. In reality, the tubes are both at the same horizontal level, as are their open ends. They are also about the same length as one another. And there are more than two.
Design considerations: Your tubes need to be large enough that water will flow through them quite well... very small tubes tend to restrict the flow. However, your pump must be able to fill the cistern quite a bit faster than the tubes are emptying it, so you can't have too many tubes, or too big tubes.
Construction: My cistern is a recycled plastic milk jug. The tubes are "attached" simply by pushing them through slightly too-small holes. The joint is not subjected to serious pressure, and so it works just fine.
A detail: The drawing shows an overflow drain coming out near the top of the right hand side of the cistern. The overflow pipe leads any excess water to the tray, from whence it will drain back into the windowbox under the tray supporting the plants.... if there happens to be any overflow. There shouldn't be (explained in a minute)... but if something goes wrong, there might be. The design provides for that water to go someplace harmless. Be sure that the overflow pipe is adequate to drain water off from the cistern faster than the pump can put water into the cistern.
I said a moment ago that there shouldn't be any overflow. And I haven't explained the switch, and the "thing" hanging down from it.
Make your switch however you wish to. It merely has to be "off" (open circuit) when the cistern is not full, but go "on" (allow electricity to flow) when the water rises as high as you want it to for each watering cycle. The "thing" hanging below the switch is heavy enough to pull the switch "off" when the "thing" is not surrounded by water, but has a bit of Styrofoam attached to it, so that when there's water, the "thing" is lifted. I am using a microswitch for my switch, and the small spring built into that is sufficient to turn the switch "on" when the weight of the "thing" is supported by the water the pump has pumped into the cistern.
Only 12 volts is passed through the switch, so the mixing of water and electricity isn't bad here. Don't be tempted to make this circuit using household voltages!!
You might think that the switch is in series with the pump... but you'd be wrong. The switch goes to a simple relay circuit (described shortly) which achieves the following:
Each time the timeswitch turns the whole watering system on, the pump operates... but only for so long as it takes to fill the cistern once. The pump then switches off... even though the timeswitch is still feeding electricity to whatever provides the system with its 12 volts. One cistern's worth of water trickles onto the plants. Everything sits quietly after that until the timeswitch has gone off again. The pump won't come on again until after the timeswitch has returned to "off". The next time the timeswitch comes on, the whole cycle repeats, and another cistern's-worth of water is delivered to the plants.
I will be describing a very small unit at the heart of the relay circuit in a moment. First I'll tell you about the external units. The colors given blow are, of course, arbitrary, but I've used those colors consistently throughout this. The small unit is referred to as "PCB200C", but you don't need to make (or buy!) a PCB to put the unit together.
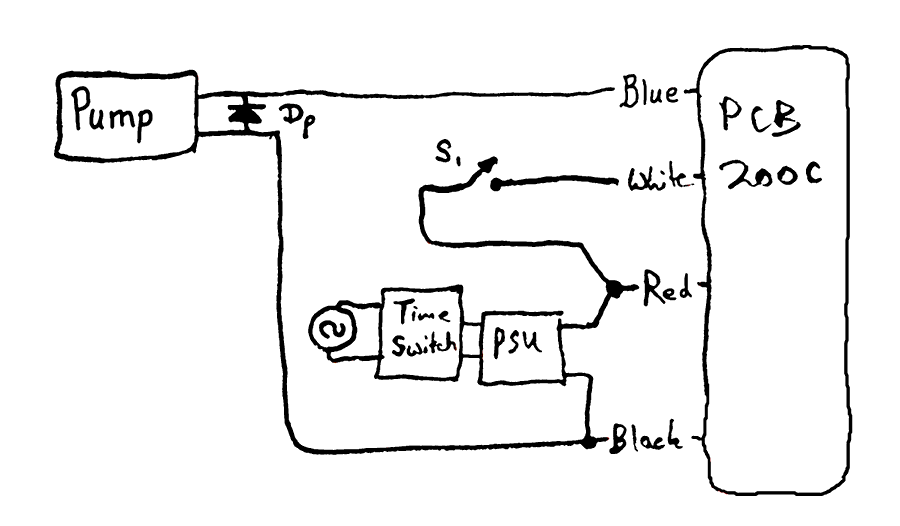
"Pump" is the automotive windscreen washer pump.
"Dp" is a diode installed across the poles of the pump. It is connected as shown so that when the pump receives 12v via the blue wire, the electricity goes into the pump, not straight through the diode, as it would if the diode were the other way around. The diode is there because some motors briefly impose large negative voltages on the circuits they are in, either as they shut down, or, in some cases, even while they are running. It is to do with magnetic fields collapsing around coils of wires. I used a 1N4004... mainly because that's what I had on hand! (The last digit tells you the device's current carrying capacity.)
"S1" is the switch I described above, the one that is open until the cistern fills, and then closes until the level of water in the cistern falls again.
"~" is a source of power for the PSU, typically the "household" electricity
"Timeswitch" is just one you can buy at any hardware store. One that allows you to set "ons" and "offs" over a full week probably best, but if you already have a 24 hour one, and want to start with that, fine. You'll just have to water the plants at least once a day, which is probably more frequently than would be best.
"PSU" is either a transformer or a car battery charger (which is a transformer in a nice box!). It's job is to change the household voltage, i.e. 110v AC in the USA, to 12v DC... or whatever voltage your pump and relay coil operate at. 12v is what an automotive pump would need, and such pumps are about perfect for this job.
Those are the parts. Now how does everything work, once it is set up? (I'll come to the details of what's inside "PCB200C" in a moment.)
Don't think I'm saying nothing new in the next few paragraphs. I may be reiterating some points, but new things are there too!
The household electricity will be on pretty well all the time. (The occasional power failure won't upset things, by the way... but until the timeswitch is re-adjusted, watering will happen at a different time of day than you intended.
The timeswitch will, from time to time, deliver voltage to the PSU, and that in turn will energize PCB200C. Through that, the pump will be turned on. So far, the relay inside PCB200C has not been turned on, its coil is not energized. The pump's circuit runs through a set of contacts in the relay which are closed when the relay is off.
When external switch "S1" closes, current flows into the relay's coil. The pump is turned off. Also, a second set of contact in the relay closes. And current flows through them to the coil, so it will stay energized for some time to come. It will stay energized, and the pump will stay off, even if the water in the cistern falls and "S1" opens again. This is the "magic" bit. It is called a "latching" relay.
The only thing that will "unlatch" the relay is cutting the power to PCB200C, but that's okay, because that's exactly what the timeswitch will do. Depending on your timeswitch, PCB200C may be receiving power for an hour or so.... but the pump will only run long enough to fill the cistern once.
PCB200C's circuit is very simple. We'll go through it in a minute. First let me describe the two things it in it besides the double pole, double throw relay. It is drawn in the not-energized state.
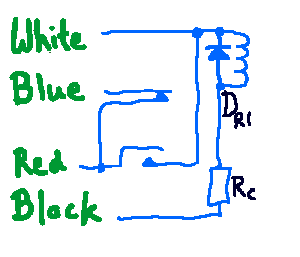
"Dr1" is a diode. It must be there to "soak up" the bursts of negative voltage which will come out of the relay each time it is switched off. It is doing pretty well the same job as the diode we met earlier, and can therefor be the same sort of diode, although a 1N4001 is probably perfectly adequate, if you happen to have one already.
"Rc" is a resistor which you will want to add if your relay's coil is meant to be driven by a voltage that is lower than the voltage of your pump and power supply. This is a pretty crude fix, subject to various problems... but I thought I'd provide for it in the PCB, just in case. Most of you will have a relay for the right voltage, I hope, and in this case you just put a wire link in instead of the resistor. That's what I tried to show in the drawing.
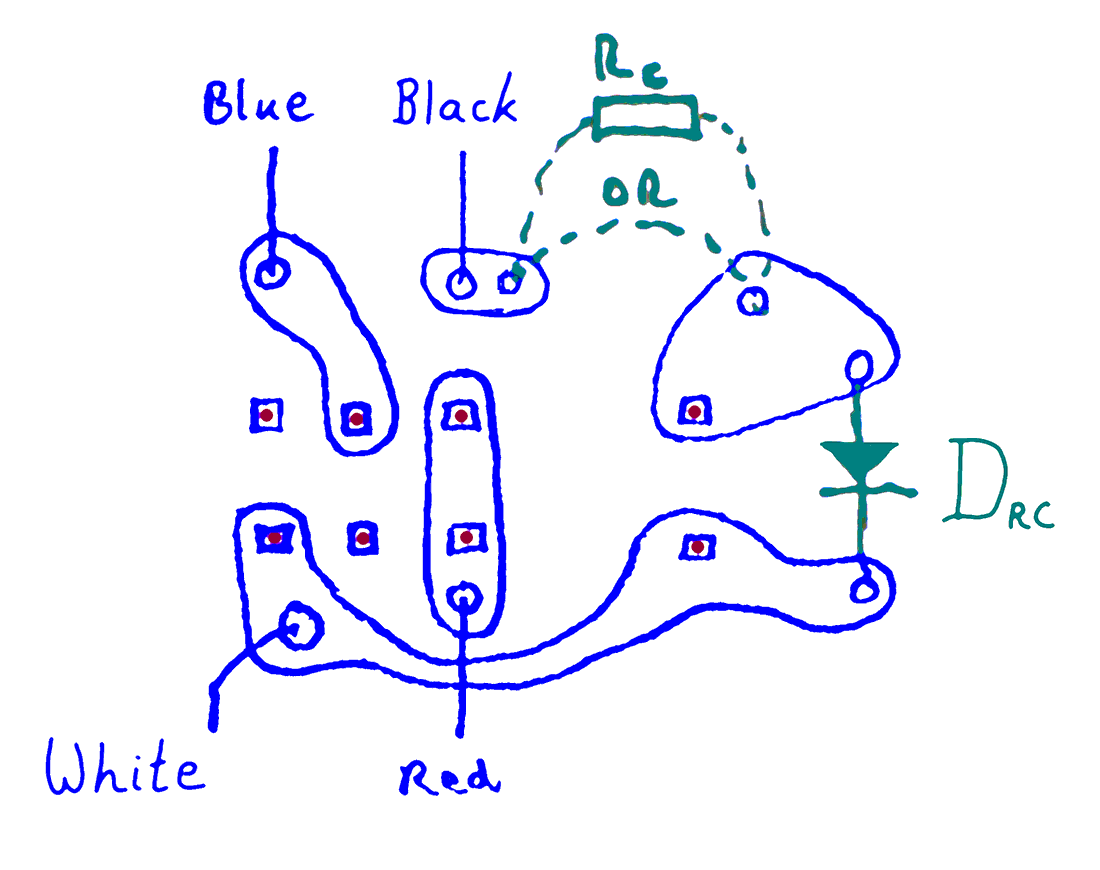
One printed circuit layout that will, ( I think !! ) work is shown to the right... but note two things:
a) I haven't tested this. (Mine is a bodge-up... I made some mistakes the THIRD time I built something along these lines. I THINK the result is the same as what you see to the right... but check it carefully!!) If you build this, and it works, please let me know??
b) The PCB depends upon your relay having the following pin-out. The blue squares with red dots in them are the footprint of the relay. Some relays are sold with the common terminals of the switches shorted internally. For this circuit, this is not a problem.

Thank you for reading this far. I hope you'll go ahead and make one... and tell me how you get on with it. (And maybe even mention my freeware and shareware to some students, parents, teachers or schools?)
Apart from the information in the footer, further down the page, the rest of this is details that you don't absolutely need. Also they are the sort of thing I would hope you would think up for yourself. If you think of good details I haven't thought of, please send them in!
The tray drainage has been enhanced. The original drain now has a plug of "wool" in it, to filter the water returning to the reservoir. (You can buy a suitable material that won't rot at a pet store... it is used in aquarium filters.) To the left of the old drain, you will see a new drain. It is a short length of, say, 2cm, plastic pipe pushed through the tray. It's upper edge is well above the level of the tray, but below its top edge. Can you guess what this is for? It is like the overflow in a bath or sink. Should the filter of the main drain become blocked, if the water in the tray rises, it will eventually be diverted into the reservoir unfiltered through this new drain, rather than spilling over the edge into your house!
The "overflow" drain is also useful for topping up the reservoir.
This is the spot to mention something you may have wondered about: Doesn't the water in the reservoir, being pretty stagnant, go all stinky? No! Well, it hasn't for me in several years, anyway.
Speaking of filters: I also have one on the intake to the pump. That's what I tried to draw at the lower right. It is also wise to do something to ensure that the intake stays as low as possible in the reservoir
You want an opaque reservoir, for reasons I will come to. But, if it is opaque, how do you know whether there is sufficient water in it? That's where the "S" shaped tube shown at the right comes it. It is made of clear plastic tubing, and the solid red is meant to represent water in the tube. Once you have the siphon set up, the level in the bit of tube outside the reservoir will reflect the level of water inside. Just be sure to properly secure the upper end of the tube, as if it drops, water from the reservoir will drain into your house.
An opaque reservoir... besides being easier to obtain and less unattractive!... reduces the one problem I have had with my system... and it hasn't been a big problem, but it has come up enough to be a warning. In some circumstances, you may get unacceptable levels of algae growth in your tubes. Limiting the light they encounter will help avoid that problem.
Sadly, the algae problem is a reason to be careful about how much fertilizer you use in your system.
Turning to some good news: If you do decide to use some fertilizer, you may be encouraged to hear something I learned on a tour of a farm producing a significant number of the peppers sold in the UK. Obviously, extremely high levels of fertilizer will "burn" the roots of your plants. However (for peppers, at least!), a little extra fertilizer does no harm. The plants take what they need, and the rest just stays in the water until it is needed. Hydroponics, again!
Speaking of "stays in the water": If you suffer from hard water, in theory you will need to drain the reservoir from time to time, and replace the "with-salts-accumulated" water. It is easy enough... if not quick... to drain the reservoir if you have set up your "level indicating siphon" with the second use in mind. I say "in theory", as I live with very hard water, and haven't drained it, and seem to have got away with it. Incidentally, (although this may be due to my small plants!) I don't find that I have to "top up" the reservoir very often.
Did you see the other "detail" in the drawing? There is a dish under the middle plant. And, in the left side of the dish, a small hole in the side. Water in below the hole will stay in the dish, giving the plant "wet feet". Some prefer this to the alternative, drier, regime. If the hole is the right size, the water above it will drain quickly enough to prevent "wet feet" problems, but slowly enough for the plant to take in more water than it would have done otherwise.
You can extend the idea of individual reservoirs (in their dishes) for individual plants, without having the "wet feet" problem, by obtaining some of the capillary "wicking" material sold by some garden centers, and putting that between the bottom of the pot and the lower levels of the dish.
This brings me to the question of what "soil" to use in the pots. In some of mine, I have ordinary potting compost. In others, I have little ceramic (porous) pebbles, intended for hydroponic growing. Both seem to work okay. I suspect glass beads would be another "hydroponic" option.
This, I hope, has set you thinking about how you can adjust the amount of water different plants get, or the plants get overall.
Of course, the simplest step you can take is to change the settings on the timeswitch, leading to more or fewer waterings. You can change the size of the cistern. You can change the number of tubes draining the cistern. There is no "rule" that says you can only dedicate one cistern-draining tube to each plant. If one plant is thirsty, give it two tubes!
What I would not do is try to use different sized cistern-draining tubes, nor would I try to restrict the opening of one of the tubes. It is quite easy to get into a situation where one tube doesn't deliver any water.
For the same reasons, I would have all of the tubes the same length, and have their "delivery" ends at the same height.
Don't be tempted to try to put "wye"s in the tubes, i.e. a device that splits one tube into two. The pressure driving the water through the tube is very slight, and the effects of friction loss and the capillary interaction between the tube and the water can overwhelm that pressure.
Well... as ever, that took longer to write up than I'd anticipated, even without developing the crude "will do for now" artwork! I hope you found it interesting, and maybe even useful. PLEASE let me know if you set something like this up... Does it work well for you? What improvements did you think of? Send a photo??
(And maybe even check out my freeware and shareware for Windows? Ad below.)